Painted Wood Photoshop Action Comics Book Photoshop Action Infographic JS Library Textures for Photoshop Online Label Maker

Brick Text Typography Surreal Photoshop Tutorial

www.psd-dude.com
Tutorials Text Effects 94508 February 5th, 2018

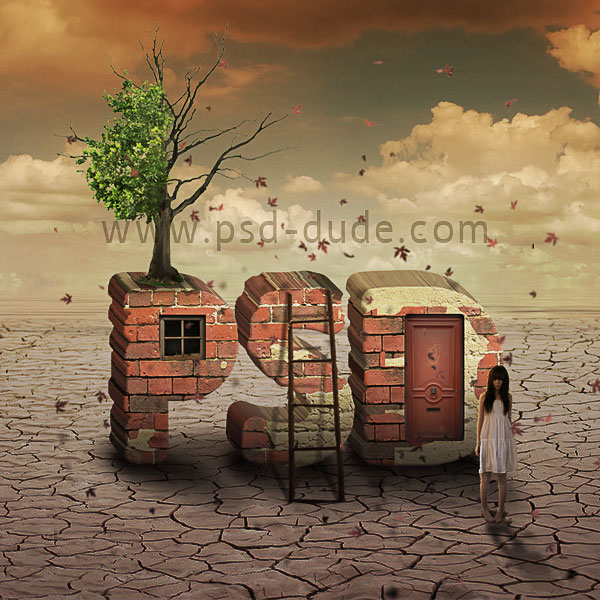
Learn how to create a 3D brick typography in Photoshop using a free 3D action maker. We will combine the brick text effect with different images to create a surreal photo manipulation. I am waiting to see your results; you can use other textures like wood for example to create your own interesting text effects.

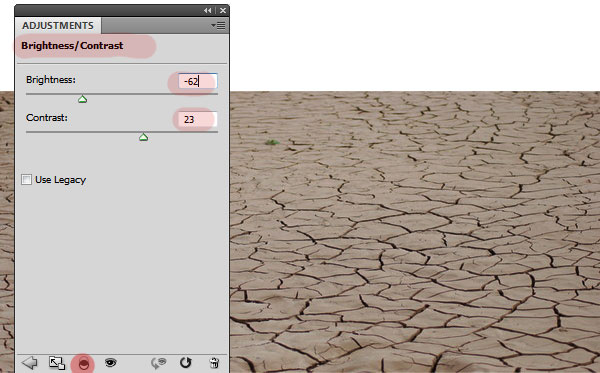
Open this crack ground in a new PSD file and add a Brightness/Contrast adjustment layer with the following settings.
Add a Gradient Overlay to this Cracked Ground Layer.

In a new layer behind the open this Cracked Ground Layer Clouds Sky stock image. To blend the sky with the ground add a layer mask to the Cracked Ground Layer to make the transition smooth between the two images. Use the Gradient Tool inside the layer mask (use a black to white gradient).

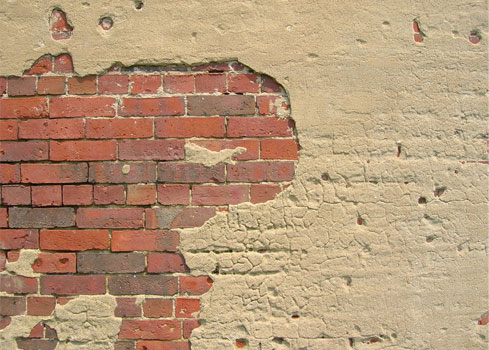
Open a new PSD file copy this brick wall texture.

Here are some other brick alternatives in case this image is no longer available or you want to choose something else:

You can always pick another brick texture from this extended collection of free textures.
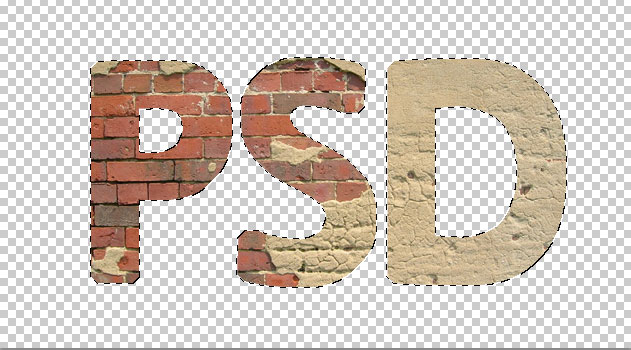
In this new PSD file use the Type Tool to write a text using Ligurino font. You can download it from the internet and install the font in Photoshop.

Press CTRL and click on the Text Layer thumbnail to make a selection. Go to Select>Modify>Expand and set 13 pixels.

Go to the Brick Texture Layer and press CTRL+J to make a Layer via Copy. Call this layer Brick Text and remove all the other layers from this new PSD file.
Use the Lasso Tool to make selections around the edges to add a distressed look to the brick text.

Make a selection out of the Brick Text Layer and use the Clone Stamp Tool to add brick texture to the "D letter".

Add a Brightness/Contrast adjustment layer to the Brick Text.

Merge the Brick Text Layer and the Brightness/Contrast adjustment layer. Download this 3D action generator and install it in Photoshop. Play the action for the Brick Text Layer; you should obtain a similar result.
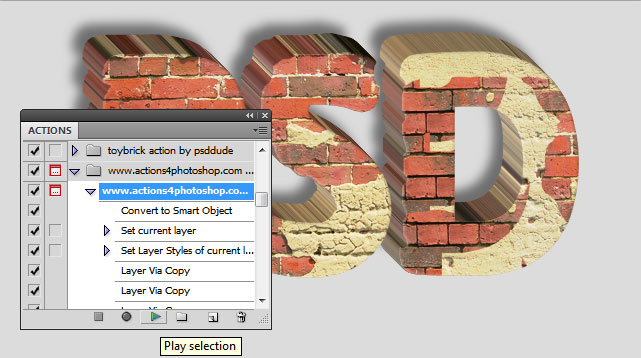
As you can see you have three groups and a background layer. Delete the shadow (actions4photoshop.com) Group and also the Background Layer.

Go to Layer>layer Style>Global Light and make these settings; you will see thtat the shading and lighting of the text changes. Group all the brick text layers and groups in one single group called Brick Text Group and move it to the initial PSD file.

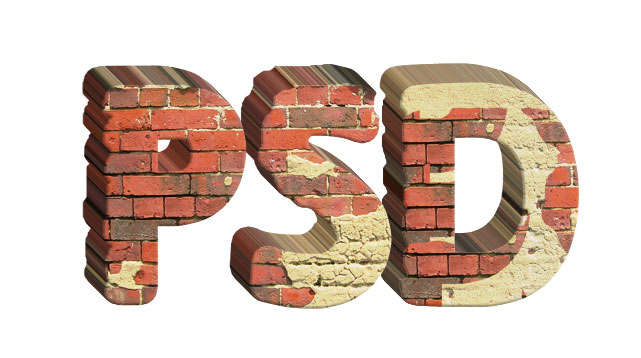
Add a shadow effect below the Brick Text using the Brush Tool, a soft round brush and color black. Lower the opacity to make it look natural. Also you have to cast a shadow for the brick text to make it look like it is standing on the cracked ground

Now I will add a window to the brick text to look like a house. Simply select and place the window, resize to fit and adjust the color/saturation/brightness.

Add a Inner Shadow and a Inner Glow for the window to look more realistic.

In a similar way add a door; crop, resize, adjust, add layer styles.

To create a surreal photo manipulation I will add an unusual dead tree on top of the "P letter".
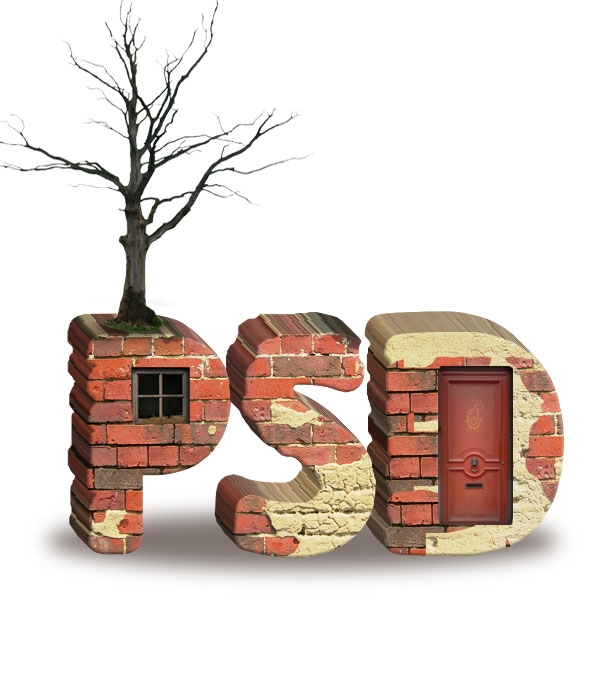
Combine the dead tree with this green tree PNG stock image. Leave only half of the tree with leafs. Use the Eraser Tool with a distressed brush to delete some aresa like shown in the image.

Add this stair ladder and place it near the "S letter"' you have to crop the ladder using a Selection Tool. Use the Edit>Transform>Distort to give the right perspective.

The ladder casts a shadow on the "S letter" so you have to create the shadow. Duplicate the Ladder Layer, make it black and distort it like in the image. LOwer the opacity to 50%.

Use the Eraser Tool to delete the shadow areas that exceeds the Brick Text Group like shown in the image.

For creating a cool effect I have added this beautiful falling leaves PNG stock image. Don't forget to also add shadow effect for the leaves on all the solid objects(brick text, ground, etc)
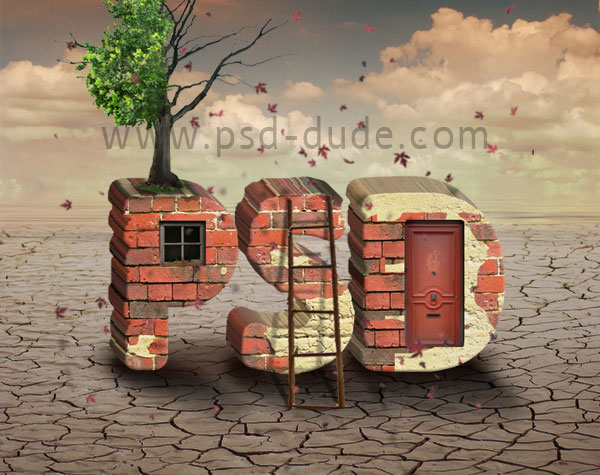
I gathered all the existing layers(except the Cracked Ground and the Sky Clouds layers) and put them inside a smart object. Add a Gradient Overlay to the smart object.

I have decide to also add a sad looking girl outside the brick text house. Remove the background of the girl photo and add some layer styles to add light and shading

Add a cast shadow effect for the girl.

For the final touches you can add more leafs around the girl, you can add a Gradient Map adjustment layer to colorize the photo, you can reduce/increase the Hue/Saturation, you can use the High Pass filter to increase the sharpness. If you want to add a grunge effect use one of these old paper textures and set the blend mode to Overlay opacity to around 50%.

4.3 ( 102 votes)

If you're looking for amazing textures and backgrounds for Photoshop, explore Textures4Photoshop where you can find 1000+ unique images. You can download all these textures and backgrounds for free to use in personal or commercial projects!

Be a Cool Dude!

With your donation you can help us maintain this website and keep producing free resources many months to come! Any amount counts

46 comment(s) for "Brick Text Typography Surreal Photoshop Tutorial"

PSDDude
4:51 AM Thursday, February 28, 2013
I have found this nice work inspired by my 3D brick photo manipulation tutorial made by Dan (http://xdaniel26.deviantart.com/art/Dan-356747591) reply
Ion
Ion
9:45 AM Sunday, March 10, 2013
How to install 3D action generator? reply
PSDDude
9:53 AM Sunday, March 10, 2013
Load an Action in Photoshop:
Step 1 - Download the ZIP file and extract the files.
Step 2 - In Photoshop go to Window menu and choose Actions
Step 3 - Click on the top right button from the Actions Panel
Step 4 - Choose Load Actions and simply choose the ATN file
Step 5 - Press the Play Selection button to run the action
reply
Sara
Sara
6:31 AM Tuesday, March 12, 2013
Ok this is what I came up with .... Thank you so much for your amazing tutorial ... :)

reply
John
6:33 AM Tuesday, March 12, 2013
Thank you Sara for practicing the tutorial and for uploading your result :) keep up the good work! reply
John
12:53 AM Wednesday, March 20, 2013
creative artwork made by White Lynx following our brick text tutorial (source http://demiart.ru) reply
John
1:30 AM Friday, March 22, 2013
I have found an amazing interpretation of my tutorial made by lolket (source http://demiart.ru) reply
John
3:02 AM Monday, April 1, 2013
I like your result :) reply
Kacma
Kacma
1:30 AM Tuesday, April 2, 2013
thank youuuu:-) reply
Trina
Trina
3:38 AM Friday, April 5, 2013
Very, very nice! :)
But the 3D action generator is not working for me.
I have Photoshop CS6
I tried everything, without any result: (
Thanks anyway. reply
John
3:41 AM Friday, April 5, 2013
The 3D action works ok for CS4 and CS5 but I am not really sure if it is working for CS6. What kind of error do you get? reply
Trina
Trina
8:09 AM Friday, April 5, 2013
There is no error appear. Just the 3D action generator do not do anything.
Thank you for your response, John :) reply
Micah Clare
Micah Clare
1:47 PM Monday, July 15, 2013
Any idea why the 3d Action generator is producing this effect? It's far too "long" of an effect...would love for it to work :( reply
PSDDUde
1:53 PM Monday, July 15, 2013
It might be from the Photoshop version, you should use CS4 or CS5; it might be from the canvas size(try it with a 500x500px canvas size). Or you can try to restart Photoshop and play the action again! reply
Olga
Olga
12:57 AM Wednesday, July 31, 2013
Logre esto, gracias! me ayudo mucho (: reply
John
1:04 AM Wednesday, July 31, 2013
Hi Olga,

I am glad you uploaded your 3D brick text photo manipulation. It looks really nice except the lighting part - the text and the girl look that they are floating. You should darken the area beneath the two items to obtain a realistic shadow! reply
Amy
Amy
8:55 AM Friday, September 20, 2013
Hiya, i'm stuck using CS6 towards the beginning.
I have done: Press CTRL and click on the Text Layer thumbnail to make a selection. Go to Select>Modify>Expand and set 13 pixels.
and: Go to the Brick Texture Layer and press CTRL+J to make a Layer via Copy. Call this layer Brick Text and remove all the other layers from this new PSD file.

But having trouble getting the brick actually behind the text?
reply
Deb Flynn
Deb Flynn
2:38 AM Saturday, October 5, 2013
Really enjoyed this effect, thank you sharing
Debs reply
GimmY
GimmY
2:39 AM Saturday, October 5, 2013
Thankss psddude!! reply
justin combs
justin combs
2:39 AM Saturday, October 5, 2013
Thanks for the tutorial amazing! reply
Jeanette
Jeanette
12:39 AM Wednesday, November 20, 2013
I really enjoyed this tut. Thank you so much. Learned a lot. reply
John
4:15 AM Wednesday, November 20, 2013
I am glad you enjoyed our tutorial ! reply
jeanette
jeanette
12:29 AM Thursday, November 21, 2013
Thank you John. I cut of the woman's feet. Should have paid more attention. Learn everyday. reply
John
1:17 AM Monday, May 5, 2014
I don't really understand the problem that you are having. Please upload a preview to see exactly what is wrong. reply
Sarah
Sarah
1:18 AM Monday, May 5, 2014
idk what im doing wrong but when i write the letters & set it to expand the letters are not separating. please help reply
gianni
gianni
6:39 AM Sunday, June 22, 2014
Thanks for the tutorial, very good!!! reply
raymund
raymund
12:56 AM Sunday, August 3, 2014
i stock in #7.. how to put brick texture in the text? reply
PSDDUde
1:01 AM Sunday, August 3, 2014
To put the brick texture inside the text you simply have to make a selection like explained in the step #6. Now click on the Brick Texture Layer name and press CTRL+J to make a copy. This copy layer has the text shape with the brick texture inside.
reply
Rose
Rose
10:42 AM Tuesday, August 12, 2014
thank a lot :) reply
Johnny
Johnny
6:57 AM Wednesday, October 22, 2014
This is such a fun tutorial. Here's my first effort. I still need to work on it but not bad for my first try.

Thanks for a great tutorial.

Johnny reply
PSDDude
7:09 AM Wednesday, October 22, 2014
Very nice brick text effect! Looks great with the flag texture that you applied. Keep up the good work :) reply
azul
azul
1:30 AM Tuesday, December 23, 2014
esta reeee buenaa
reply
gurbir
gurbir
2:09 AM Tuesday, March 10, 2015
here'z mine
it was my first try
thanks alot reply
svetlana
svetlana
8:44 AM Tuesday, May 12, 2015
Many Thanxxxxx! reply
dima
dima
3:04 AM Wednesday, February 24, 2016
Here is my work. Could you please judge me? I just started learning Photoshop. Thanks. reply
PSDDude
3:07 AM Wednesday, February 24, 2016
Even though the image is small and I can not see the details, the brick text looks pretty good to me. The lighting and the shading effects are good also. So for a Photoshop beginner this is a great start :) reply
Abdellah
Abdellah
3:24 AM Sunday, April 10, 2016
hi there ,

i am on part 8

can you tell me how to add a distressed using lasso tool ?


thank you , reply
PSDDude
3:30 AM Sunday, April 10, 2016
The Lasso tool is useful for drawing freeform segments of a selection border.

Simply draw the edges of the shapes that you want to select(using the Lasso Tool) and press delete to erase them. reply
Djroli
Djroli
3:17 AM Monday, October 10, 2016
Please how can I download the 3D Photoshop action generator, I've been trying it severally but its not working reply
PSDDude
3:18 AM Monday, October 10, 2016
You can download the 3D Action Generator from here:
http://www.actions4photoshop.com/atn/3d-effects/3d-photoshop-action-generator-for-text-and-shape.aspx

You have a Download button at the end of the page, before the Facebook comments. reply
Kacma
Kacma
1:06 PM Monday, April 29, 2019
Thanks!!! reply
Corey
Corey
1:06 PM Monday, April 29, 2019
Thanks a lot for a great tut! reply
reb
reb
1:06 PM Monday, April 29, 2019
thanks god, you make this 3D plugin for free. lol reply
John
10:37 AM Wednesday, August 21, 2024
That is really strange. Try to convert your layer to smart object(right click on the layer name and choose Convert to Smart Object). Than go to the second step of the action like shown in the image and click Play, maybe that way it will work.
If not you will have to create the 3D effect like in this 3D text tutorial or you can use the 3D Tool feature that CS6 has. reply
John
10:37 AM Wednesday, August 21, 2024
Hi Amy, try to use a Clipping mask

Use the Brick Texture Layer and the Text Layer. Right click on the Brick Texture Layer and choose Create Clipping Mask reply
John
10:37 AM Wednesday, August 21, 2024
We all learn something new every day :) If you want to know how to create realistic cast shadow effects in Photoshop you might try these tutorials. reply

Have something to say? Leave us a comment

Click to Upload Fan Art!

Share your Psd Dude inspired works


Get new posts by email:
top