


Part 2
Step 4 – Pucker the Eyes
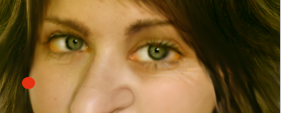
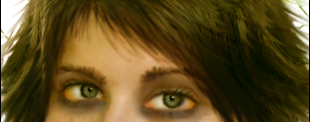
Give a meaner look to the eyes. Go to Liquify – Pucker Tool size 43 and make the eyes smaller like in the picture below…put the cursor in the middle of the iris(eye).

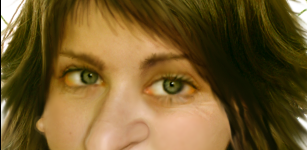
The Eyebrows – for bigger eyebrows I used Smudge Tool size 4 and I tripled the size of the eyebrow…with the Burn Tool I make the eyebrows darker and than I used Smudge Tool again this time a smaller size 2…and I draw rebel hair wires…It is important when you use Smudge Tool to use appropriate size and strength (I used 50 % strength) to obtain a realistic result.
Step 6 – The mole
Mole ….no witch without face mole…simply draw a circle with the ellipse tool and place it near the part of the skin where you want to attach it.
Than change the color of the circle by picking a tone closer to the skin.
Now right click on the circle layer and rasterize it…..now you can give it shape and 3D look with burn and dodge tools.
Now you can place as many moles as you want …I put one on the chin also.
Step 7 – Add make up
With Brush Tool and color #030201 paint in a new layer the area around the eyes. Now set the opacity of the layer to 25 %.

For the hair effect we will use Smudge Tool …you have to make straight lines from one move …it is easy with the mouse you don’t need a tablet. Take your time and do this step slowly…changing the size of the brush and strength when needed….
You can also use Burn Tool to accentuate some parts of the hair….I strongly advise you after a successfuly done step to duplicate the layer so if you do something wrong to have a copy and not to lose all the work.

Step 9 – Add a big smile
For the tooth I’ve used this photo http://www.flickr.com/photos/dey/77901012/
Crop the tooth and place it in the mouth area. Use the warp tool to make the tooth even more real (edit - transform – warp)
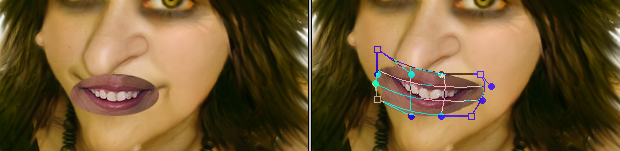
Zoom in the document and begin erasing the areas from the mouth that you don’t need. We will use the tooth and the bottom lip. Rotate the tooth 2,9 ( edit – transform – rotate)

1 comment(s) for "Turn a girl into a witch"